This section explores the various elements of the Fly View.
In the Fly View, missions are executed and monitored. The operator has two layouts available: by default, the Map is the Primary View, while the Video Feed is the Secondary View. You can change the layout by clicking the small window in the lower-left corner.
Primary View - map, Secondary View - video feed:
Primary view - video feed, Secondary View - map:
The smaller Secondary Window in the lower-left corner can be resized by clicking the two arrows in the upper-right corner. Drag the window to adjust it to your desired size.
The following list outlines the actions that can be performed within the Secondary Window.
Minimize or maximize the window.
Adjust the size of the window.
Detach the window from the lower-left corner.
The available Fly Tools change depending on whether the map or video feed is the Primary View. When the map is the Primary View, all Fly Tools are accessible. Conversely, when the video feed is the Primary View, the payload controls on the right side of the screen become available.
Map is the Primary View: All Fly Tools, Flight, and Map Tools are available (when running AMC in Advanced Mode) on the left side of the screen.
Video Feed is the Primary View: Payload controls, if applicable (in this example, ISR payload), are available on the right side of the screen, while Fly Tools (selection), Flight, and Map Tools are accessible on the left side.
The available payload controls depend on the mounted payload. The different payload controls will be discussed separately in their dedicated sections.
The following list outlines all the elements of the Fly View.
For a detailed overview of AMC's Top Bar items, please revisit the chapter AMC Top Bar.
AMC Menu
Vehicle Status Indicator
Flight Mode Selector and Indicator
Emergency Actions and Arm/Disarm Status
Radio Link Indicator/Selector
GPS Status/GPS Fusion
Data Link Signal Strength Indicator
LTE Status and Signal Strength Indicator
Vehicle Battery Status/Energy Consumption
GCS Battery Status
Telemetry Dashboard
Video Feed (payload-dependent)
Map Tools
Flight Tools
Fly Tools (Quick Access)
Estimated Flight Time Remaining
Geo-Tracking Dashboard (ISR payload)
Map, Mission Items, Smart Actions, Vehicle Location (blue arrow), and Vehicle Track (red trail)
When zooming in and out, a Scale Indicator appears at the bottom of the screen to show the current zoom scale. To use the zoom function, you can either use the mouse wheel or the touchscreen. It indicates the scale of the map based on the zoom level.
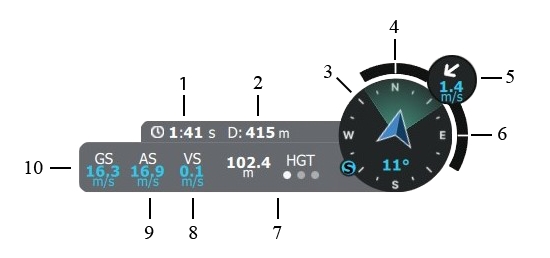
The Telemetry Dashboard is located in the lower-right corner of the screen. It is available in both layouts, whether the Map or the Video is the Primary View.
Time Since Armed (approximate flight time)
Distance Between Vehicle and Ground Station
Compass (includes vehicle heading, camera field of view, and direction towards the Ground Control Station)
Roll Index
Wind Direction and Wind Speed
Pitch Index
Altitude Display - Tap the letters above the three dots to switch between different altitude measurements
Vertical Speed
Calibrated Airspeed
Ground Speed/Horizontal Speed
Basic flight operations are initiated by pressing the appropriate button in the Fly Tools. Fly Tools are useful even during manual flight, as they streamline tasks such as Takeoff and RTL. Only the valid tool options for the current vehicle state are displayed, while invalid options are either hidden or grayed out.
Clicking the arrow opens the sidebar, revealing the title next to each icon.
The following Fly Tools are available on the left side of the screen when the Map is in Primary View.
All of the above actions will require user confirmation before execution.
The following Flight Tools are available on the left side of the screen when the Map is in Primary View and AMC is running in Advanced Mode.
All of the above actions will require user confirmation before execution.
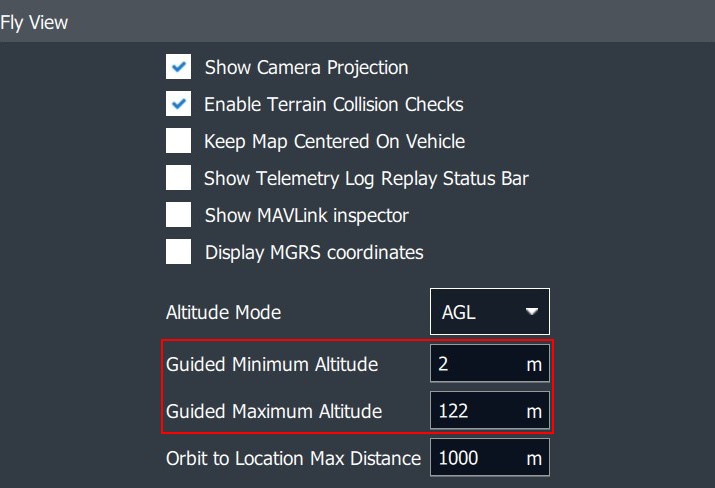
When using the Orbit or Figure-8 command, the Altitude Slider is presented on the right side of the screen with a fixed minimum and maximum altitude. The operator can choose an altitude between these values.
These values can be changed in AMC menu -> Settings -> General -> Fly View.
The following Map Tools are available on the left side of the screen when the map is in Primary View and AMC is running in Advanced Mode.
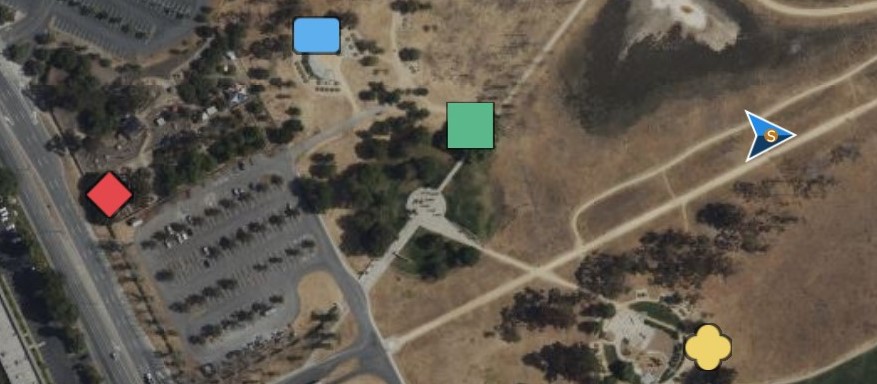
Different Marker Tool categories can be selected by color and shape. Click on the map to set the marker.
On the right side of the screen, an option will be available to set coordinates for the specific marker.
To delete a marker, select it on the map and click on the small Trash Bin.
To delete all markers, click on the Trash Bin icon in the Marker Tool menu.
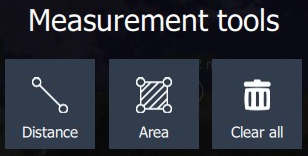
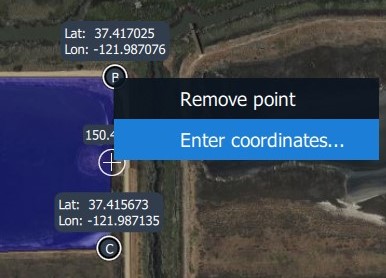
The distance between two points can be measured, or the area can be calculated as a selectable polygon. Selecting Clear All will delete all Measurement Tools on the map.
Coordinates can be entered manually, and specific points can be removed.
The Fly View presents important warnings in a highly visible popup, alerting you to any unexpected behavior or issues. When possible, the notification will also provide the cause of the problem and suggest any required actions. Less critical messages, along with any missed warnings, are logged and can be accessed in the Vehicle Overview.
| Symbol | Meaning |
|---|---|
| Symbol | Command | Action |
|---|---|---|
Clicking the Flight Tools button in the lower-left corner of the screen will open an extra set of commands for controlling the vehicle. When the button is blue, it is active, and the additional commands will be visible. When the button is gray, it is inactive, and the extra commands will be hidden.
| Symbol | Command | Action |
|---|---|---|
Clicking the Map Tools button in the lower-left corner of the screen opens the Map Tools. When the button is blue, it is active, and an extra set of commands will be visible. When the button is grey, it is inactive, and the extra commands will be hidden.
| Symbol | Command | Action |
|---|---|---|
The Marker Tool can be used to increase situational awareness. The set markers will also be displayed in the video feed. When clicking on the Marker Tool button, a menu will open.
The Measurement Tool button opens a menu.
HGT
Height (Heights are referenced to the takeoff location)
MSL
Mean Sea Level (Altitude Above Mean Sea Leve)
AGL
Above Ground Level (Altitude Above Ground Level)
Takeoff
Commands for (Quick) Takeoff—Altitude, Transition Direction, Loiter for Takeoff, and Approach Sectors—can be set.
Return
Return to Launch – The vehicle will return using the approach feature if at least one green sector is set. If no green sector is available, the planned landing pattern will be used.
Hold
Pauses the mission or any ongoing action. The vehicle will loiter at its current location.
Mission
Starts or resumes the planned mission.
POI
Orbit
Sets an Orbit with selectable altitude, radius, and loiter direction.
Figure of 8
Sets a Figure-8 with selectable size and altitude. The Figure-8 automatically realigns to keep the POI in view when a POI is set.
Change Airspeed
Enables the operator to change the Airspeed. When clicked, the Airspeed Slider appears on the right side of the screen, with values ranging from 14 m/s to 23 m/s available.
Land
Multirotor Mode (Hover): Land the vehicle at the current location and disarm (option visible if flying).
Fixed-wing Mode (Aero): Transition to Multirotor Mode (Hover) and land at the current location.
VTOL Transition
VTOL Transition is used to toggle a transition between VTOL Fixed-wing (Aero) and Multirotor (Hover) modes. (Only available in AMC Advanced Mode).
Target
Following
The vehicle actively follows a tracked target. To engage in Target-Following mode, you must first track a target.
Center Map
Centers the map on the vehicle or GCS location, if available.
Marker
Place markers to enhance situational awareness.
Clear Path
Delete the flight path to clear the map.
Map Layers
Switch between map layers.
Load KML overly
Import a KML file to the map.
Measure
Opens the Measurement Tools.
Depending on the payload, a Point of Interest can be set. The camera (gimbal) will follow the specified location while the vehicle remains on its flight path. The Point of Interest can be removed by clicking on Cancel PIO:


